> ## Documentation Index
> Fetch the complete documentation index at: https://docs.onelox.io/llms.txt
> Use this file to discover all available pages before exploring further.
# Get started
> Connect your Shopify store to ONELOX
## Preparations
1. Create a new private App in your Shopify merchant [Dev Dashboard](https://shopify.dev/docs/apps/build/dev-dashboard/create-apps-using-dev-dashboard#step-1-create-a-new-app)
2. [Create a version](https://shopify.dev/docs/apps/build/dev-dashboard/create-apps-using-dev-dashboard#step-2-create-a-version) with the following access scopes:
* `read_assigned_fulfillment_orders`
* `write_assigned_fulfillment_orders`
* `read_fulfillments`
* `write_fulfillments`
* `read_merchant_managed_fulfillment_orders`
* `write_merchant_managed_fulfillment_orders`
* `read_third_party_fulfillment_orders`
* `write_third_party_fulfillment_orders`
* `read_custom_fulfillment_services`
* `write_custom_fulfillment_services`
* `read_orders`
* `read_products`
* `read_inventory`
* `write_inventory`
* `read_customers`
* `read_locations`
* `write_locations`
3. [Install the App](https://shopify.dev/docs/apps/build/dev-dashboard/create-apps-using-dev-dashboard#step-3-install-your-app) to your store. Please note the distribution method of the App must be "Custom distribution".
4. Write down the [Client ID](https://shopify.dev/docs/apps/build/dev-dashboard/create-apps-using-dev-dashboard#step-3-install-your-app)
The Client ID will be required in a later step.
5. Reveal and save the Client secret (starting with `shpss_`)
The Client secret will be required in a later step.
## Install the Shopify integration
Select and install Shopify v2 from the ONELOX integration marketplace.
 ### Fill in the required credentials
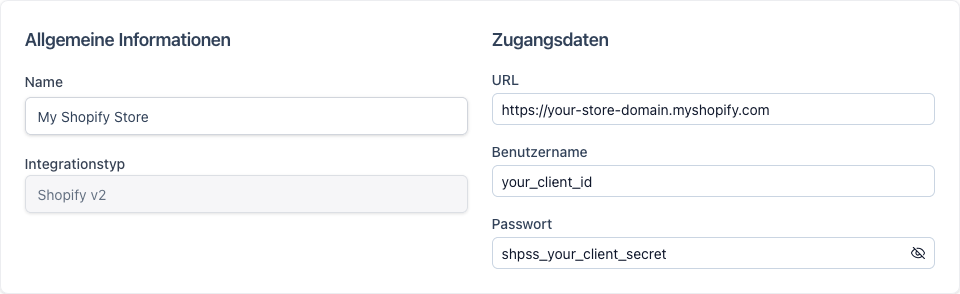
Use your Shopify Admin URL (`https://your-store-domain.myshopify.com`) and the Client ID and Client secret generated in
preparations step #4 and #5. Set the Client ID as the username and Client secret as the password.
Choose any name you want, but consider it will be visible in Delivery Notes and references,
so we recommend using a clear and recognizable name that lets users easily identify
the store your integration belongs to.
### Fill in the required credentials
Use your Shopify Admin URL (`https://your-store-domain.myshopify.com`) and the Client ID and Client secret generated in
preparations step #4 and #5. Set the Client ID as the username and Client secret as the password.
Choose any name you want, but consider it will be visible in Delivery Notes and references,
so we recommend using a clear and recognizable name that lets users easily identify
the store your integration belongs to.
 ### Configure additional options
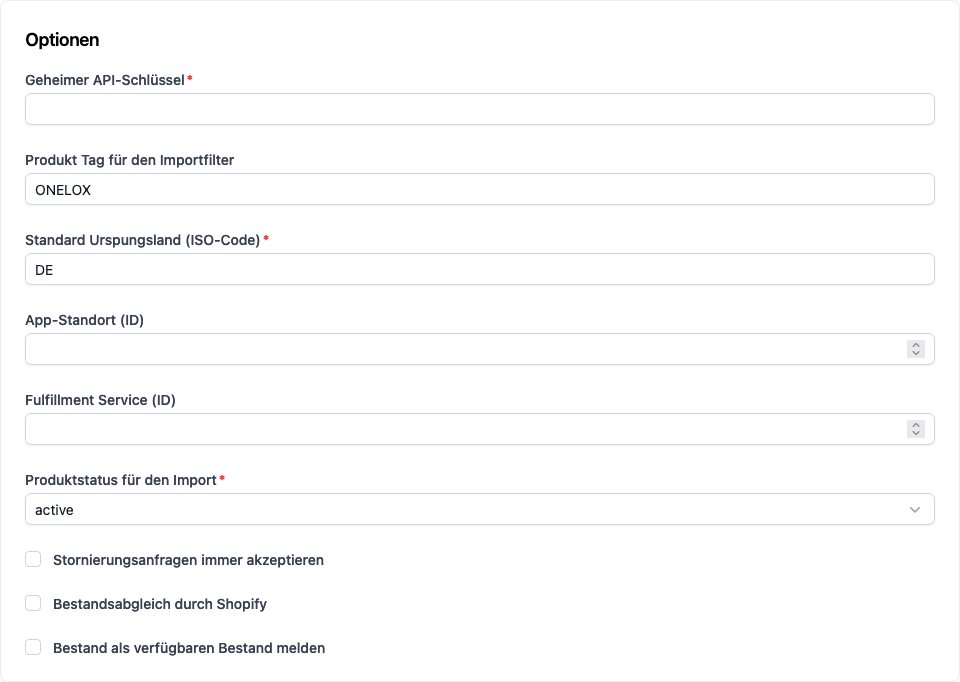
Use the Client secret you wrote down in preparations step #5 as the secret API key.
App location ID and fulfillment service ID will be automatically assigned by Shopify
and filled in by ONELOX after installation.
All options except location and fulfillment service ID may be changed after installation.
### Configure additional options
Use the Client secret you wrote down in preparations step #5 as the secret API key.
App location ID and fulfillment service ID will be automatically assigned by Shopify
and filled in by ONELOX after installation.
All options except location and fulfillment service ID may be changed after installation.